At some point, when you develop an application, you may need a unique human-readable identifier for some of the models. This article explores different methods of creating auto-incremented and prefixed IDs for Django models, such as INV00001 or ORD0003, providing a detailed guide with examples.
- Understanding Prefixed Auto-Incremented IDs in Django
- Benefits of Using Prefixed IDs
- Exploring different methods for implementing prefixed ID fields
- Conclusion
Understanding Prefixed Auto-Incremented IDs in Django
Each model is typically assigned with an auto-incremented unique ID as the primary key. Whenever you define a model in Django, it will add this ID column/field to the model built-in if you don’t tell otherwise. Django and database thill increments with each new record automatically manage this ID. The AutoField in Django is a built-in field type that handles this behavior. For example:
At some point, when you develop an application, you may need a unique human-readable identifier for some of the models. This article explores different methods of creating auto-incremented and prefixed IDs for Django models, such as INV00001 or ORD0003, providing a detailed guide with examples.
Understanding Prefixed Auto-Incremented IDs in Django
Each model is typically assigned with an auto-incremented unique ID as the primary key. Whenever you define a model in Django, it will add this ID column/field to the model built-in if you don’t tell otherwise. Django and database thill increments with each new record automatically manage this ID. The AutoField in Django is a built-in field type that handles this behavior. For example:
from django.db import models

class Order(models.Model):
    id = models.AutoField(primary_key=True)
However, developers often require more than just a numerical ID. We might need a prefixed ID for better identification and sorting of records. For instance, adding a prefix such as ‘ORD’ to an order ID can make it more informative and easier to recognize.
Benefits of Using Prefixed IDs
Prefixed IDs in Django models offer a multitude of advantages over traditional numeric auto-incremented identifiers
#1 Readability
One significant benefit is the enhanced readability and context they provide. By including a prefix, IDs can immediately convey information about the type of object they represent, making them more intuitive for developers and users alike. For instance, an order with the ID ORD-1001 is easily identifiable as an order, unlike a nondescript number like 1001. This makes communicating the issues with users during the support ticket handling much more straightforward.
#2 Data Organization
Another key advantage is the improved organization and sorting of records. Prefixed IDs can help categorize data, particularly useful in systems with multiple entity types. This categorization can simplify data retrieval and manipulation and enhance the overall database management experience.
#3 Better Security
Moreover, using prefixed IDs can contribute to better security practices. They can obscure a system's actual number of records, making it less noticeable to infer the dataset's size or the records' creation sequence. This can be a subtle yet effective deterrent against specific data enumeration attacks.
Exploring different methods for implementing prefixed ID fields
Implementing human-readable, queryable, prefixed, and automatically incremented ID-like fields requires a bit of customization but dramatically enhances the usability and readability of your data. To follow along with the provided examples, you first must set up a Django project.
Setting up the Django project
Setting up a Django project with PostgreSQL is a straightforward process. Here are the steps to follow:
- Install PostgreSQL and create a new database for your project. Or use Docker to setup a PostgreSQL database
- Update the
DATABASESsetting in your Django project’ssettings.pyfile to use PostgreSQL as the database backend. - Install the
psycopg2-binarypackage, which is the PostgreSQL adapter for Python. - Run the Django migrations to create the necessary tables in the database.
My Docker Compose setup for this tutorial:
# file: docker-compose.yml

version: "3"

# external services to connect to
services:

  postgres:
    image: postgres:12
    container_name: tutorial_postgres
    restart: always
    volumes:
      - tutorial-postgres:/var/lib/postgresql/data
    ports:
      - "5439:5432"
    env_file: .env
    healthcheck:
      test: ["CMD-SHELL", "sh -c 'pg_isready -U ${POSTGRES_USER} -d ${POSTGRES_DB}'"]
      interval: 5s
      timeout: 5s
      retries: 5

volumes:
  tutorial-postgres:
Django Settings:
# file: settings.py

DATABASES = {
    "default": {
        "ENGINE": "django.db.backends.postgresql_psycopg2",
        "NAME": os.environ.get("POSTGRES_DB"),
        "USER": os.environ.get("POSTGRES_USER"),
        "PASSWORD": os.environ.get("POSTGRES_PASSWORD"),
        "HOST": os.environ.get("POSTGRES_HOST"),
        "PORT": os.environ.get("POSTGRES_PORT"),
    }
}
Requirements:
# python:  3.12.2
# file: requirements.txt
asgiref==3.7.2
Django==5.0.2
psycopg2-binary==2.9.9
sqlparse==0.4.4
Starting models:
from django.db import models
from django.conf import settings

# Create your models here.

class Customer(models.Model):
    user = models.OneToOneField(
        settings.AUTH_USER_MODEL,
        on_delete=models.CASCADE
    )
    address = models.TextField()

    def __str__(self):
        return self.user.username

class Order(models.Model):
    customer = models.ForeignKey(Customer, on_delete=models.CASCADE)
    product_name = models.CharField(max_length=100)
    quantity = models.IntegerField()
    price = models.DecimalField(max_digits=10, decimal_places=2)
    order_date = models.DateField()

    def __str__(self):
        return f"{self.product_name} - {self.quantity}"

class Invoice(models.Model):
    order = models.OneToOneField(Order, on_delete=models.CASCADE)
    invoice_date = models.DateField()
    total_amount = models.DecimalField(max_digits=10, decimal_places=2)

    def __str__(self):
        return f"Invoice for Order: {self.order.id}"
Now lets explore different method to implement prefixed ID.
Method #1: Overriding save Method
Concept
The simplest way to start is by overriding the model's save method. This method allows you to inject your logic for creating a custom ID before saving the model instance to the database.
Implementation
from django.db import models
from django.utils.translation import gettext_lazy as _

class Order(models.Model):
    order_id = models.CharField(max_length=10, unique=True, editable=False)
    # Other fields

    def save(self, *args, **kwargs):
        if not self.order_id:
            prefix = 'ORD-'
            last_order = Order.objects.all().values('order_id').order_by('id').last()
            if not last_order:
                new_id = 1
            else:
                number = int(last_order.get("order_id", 1).replace(prefix, '') or 1)
                new_id = number + 1
            self.order_id = prefix + str(new_id).zfill(5)
        super().save(*args, **kwargs)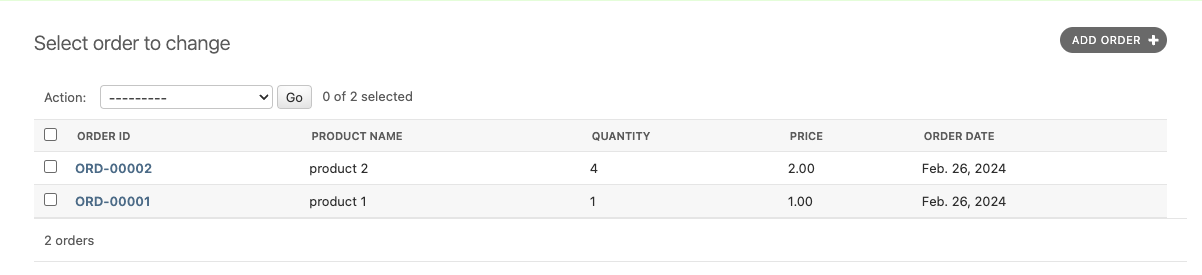
Explanation
In this method, you check if the order_id is already set. If not, you generate a new one by finding the last order created, extracting its numeric part, incrementing it, and then concatenating it with the prefix and leading zeros to maintain the format.
Method #2: Django Signals
Concept
Django signals allow decoupling of applications by sending notifications when actions occur. A pre_save signal can be used to modify the instance before it's saved without altering the model's save method directly.
Implementation
# models.py

from django.db.models.signals import pre_save
from django.dispatch import receiver

...

class Invoice(models.Model):
    invoice_id = models.CharField(max_length=10, unique=True, editable=False)

    # other fields

...

@receiver(pre_save, sender=Invoice)
def set_invoice_id(sender, instance, *args, **kwargs):
    if not instance.invoice_id:
        prefix = 'INV'
        last_invoice = Invoice.objects.all().order_by('id').last()
        if not last_invoice:
            new_id = 1
        else:
            invoice_number = int(last_invoice.invoice_id.replace(prefix, ''))
            new_id = invoice_number + 1
        instance.invoice_id = prefix + str(new_id).zfill(4)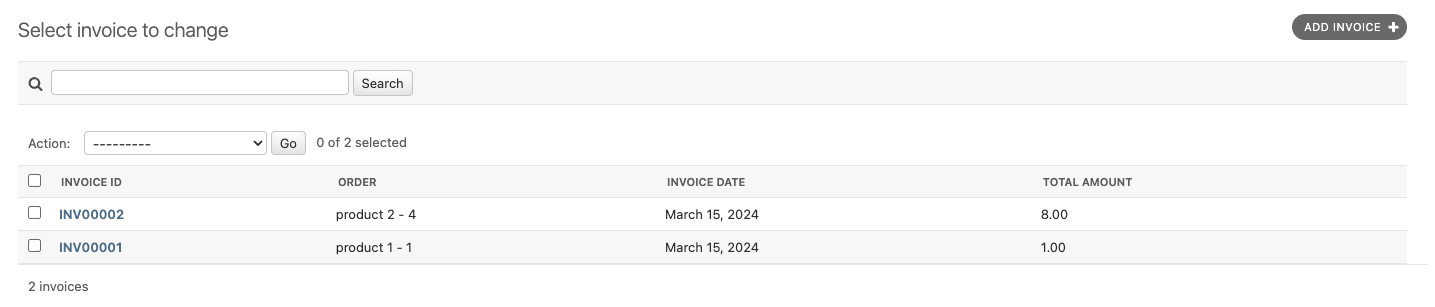
Explanation
This approach uses Django's signal framework to listen for the pre_save event on the Invoice model. When an invoice is about to be saved and doesn't have an invoice_id set, it calculates the new ID and sets it.
Method #3: Custom Model Field (Recommended)
Concept
Creating a custom model field allows you to encapsulate the logic for generating the custom ID, making your models cleaner and your custom ID logic reusable. The critical point in this method is “reusable.”
Implementation
from django.db import models

class PrefixedIDField(models.CharField):
    def __init__(self, *args, prefix='PRE', zfill=5, **kwargs):
        self.prefix = prefix
        self.zfill = zfill
        kwargs['max_length'] = kwargs.get('max_length', 10)  # default max_length is 10
        super().__init__(*args, **kwargs)

    def pre_save(self, model_instance, add):
        if add:
            last_id = model_instance.__class__.objects.all().order_by('-id').first()
            lastest_value = getattr(last_id, self.attname, None)
            if last_id:
                last_id = int(lastest_value.replace(self.prefix, '')) + 1
            else:
                last_id = 1
            value = f'{self.prefix}{str(last_id).zfill(self.zfill)}'
            setattr(model_instance, self.attname, value)
            return value
        return super().pre_save(model_instance, add)

class Customer(models.Model):
    customer_id = PrefixedIDField(prefix='CUST', unique=True, editable=False)

    # other fields...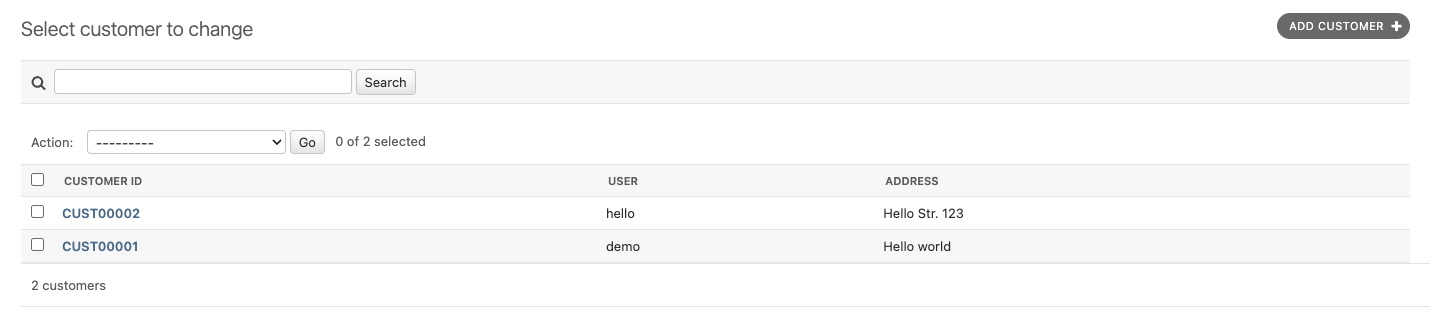
Explanation
This custom field inherits from CharField and overrides the pre_save method to insert the logic for generating the custom ID. This method makes your models cleaner and the custom ID logic reusable across different models if needed.
Bonus Method: Model @property
Concept
The @property decorator in Python allows you to define a method in your class that can be accessed like an attribute. This feature can be used in Django models to create a custom formatted ID that combines a prefix with the existing auto-incremented id field of a model instance. This method does not change the actual ID in the database but provides a formatted string that can be used in the user interface, reports, or exports.
Implementation
from django.db import models

class Customer(models.Model):
    # Other fields as necessary

    @property
    def prefixed_id(self):
        """Generates a human-readable ID with a prefix."""
        return f"USR-{self.id:05d}"
In this example, the Customer model still uses Django's default auto-incrementing id as its primary key. The @property named prefixed_id generates a string that combines a 'USR-' prefix with the id, formatted as a five-digit number with leading zeros.

Explanation
This method might seem advantages:
- Non-intrusive: It doesn't require any changes to the existing database schema or the Django model's primary key mechanism. This means it can easily be added to existing models without requiring data migration or schema modification.
- Performance: Because the underlying
idfield is still an integer, database indexing and lookup performance are not affected. The custom format is applied only when accessing theprefixed_idproperty, typically at the application level. - Flexibility: The formatting logic is encapsulated within the model, making it easy to change the prefix or the formatting without affecting the rest of the application. If the requirements change, you only need to update the logic in one place.
- Readability: For user interfaces or external communications, displaying a more descriptive ID can be more user-friendly and professional. It makes IDs easier to read, communicate, and reference.
However, it is important to note that this method has some limitations and considerations:
- Data Integrity: The
prefixed_idis not stored in the database as such. Therefore, when querying or filtering data, you must use the originalidfield. Theprefixed_idis suitable for display purposes and should be used in situations where a more descriptive identifier benefits the user experience. - Security: Exposing your ID field might not be a good idea in the long run. It is recommended to carefully consider the security implications of exposing internal identifiers to external systems or users.
Conclusion
By integrating custom ID fields with Django admin and forms, you can enhance the management and usability of your Django applications. This approach ensures that your custom IDs are correctly displayed and handled in the admin interface and custom forms, providing users with a seamless experience while maintaining the integrity and uniqueness of your IDs.
Not only does this improve the administrative capabilities of your Django application, but it also aligns with best practices for web application development. This way, you can ensure that your application remains robust, scalable, and easy to maintain.